Three Worlds, One Image: Revised Star Trek Character Sketches

Work In Progress / 12 May 2022

My first pass through drawing the Star Trek characters gave me a chance to work out likenesses and costume details on an individual basis. The layout revision necessitated thinking about them as a group and, more than any of the Star Wars or Alien characters, how they were going to interact with their environment.

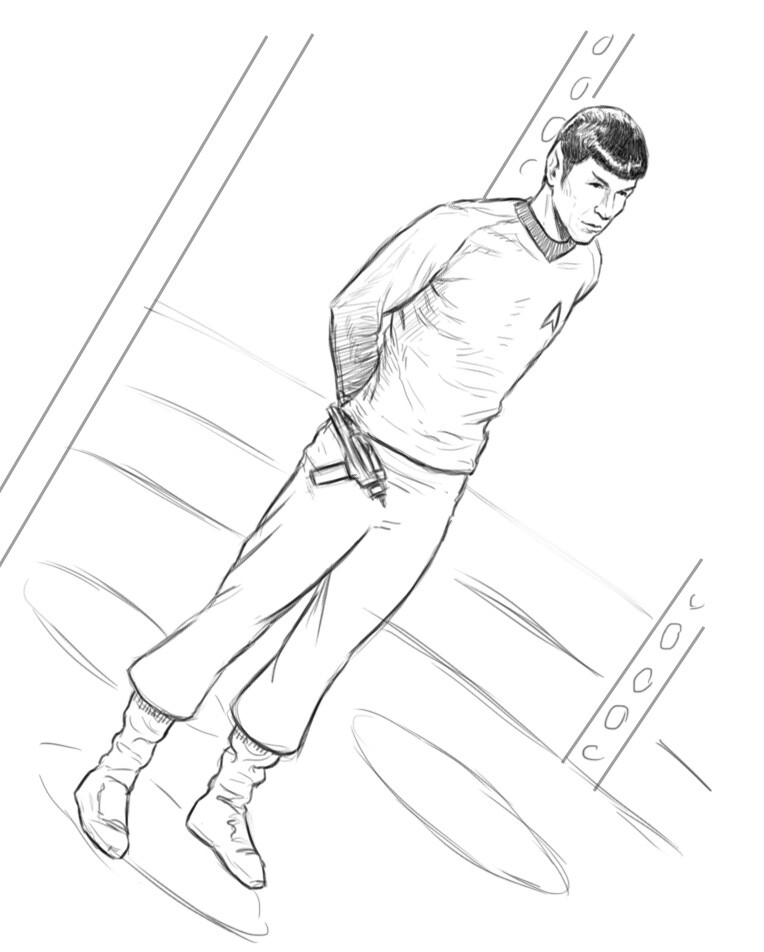
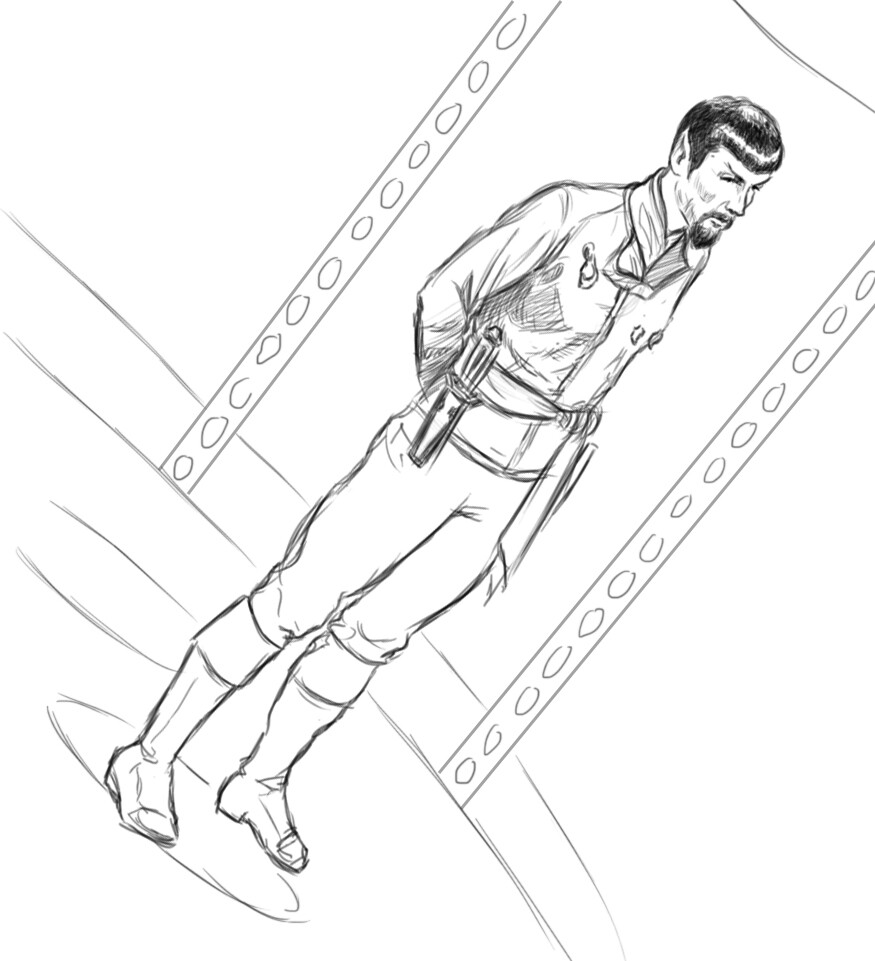
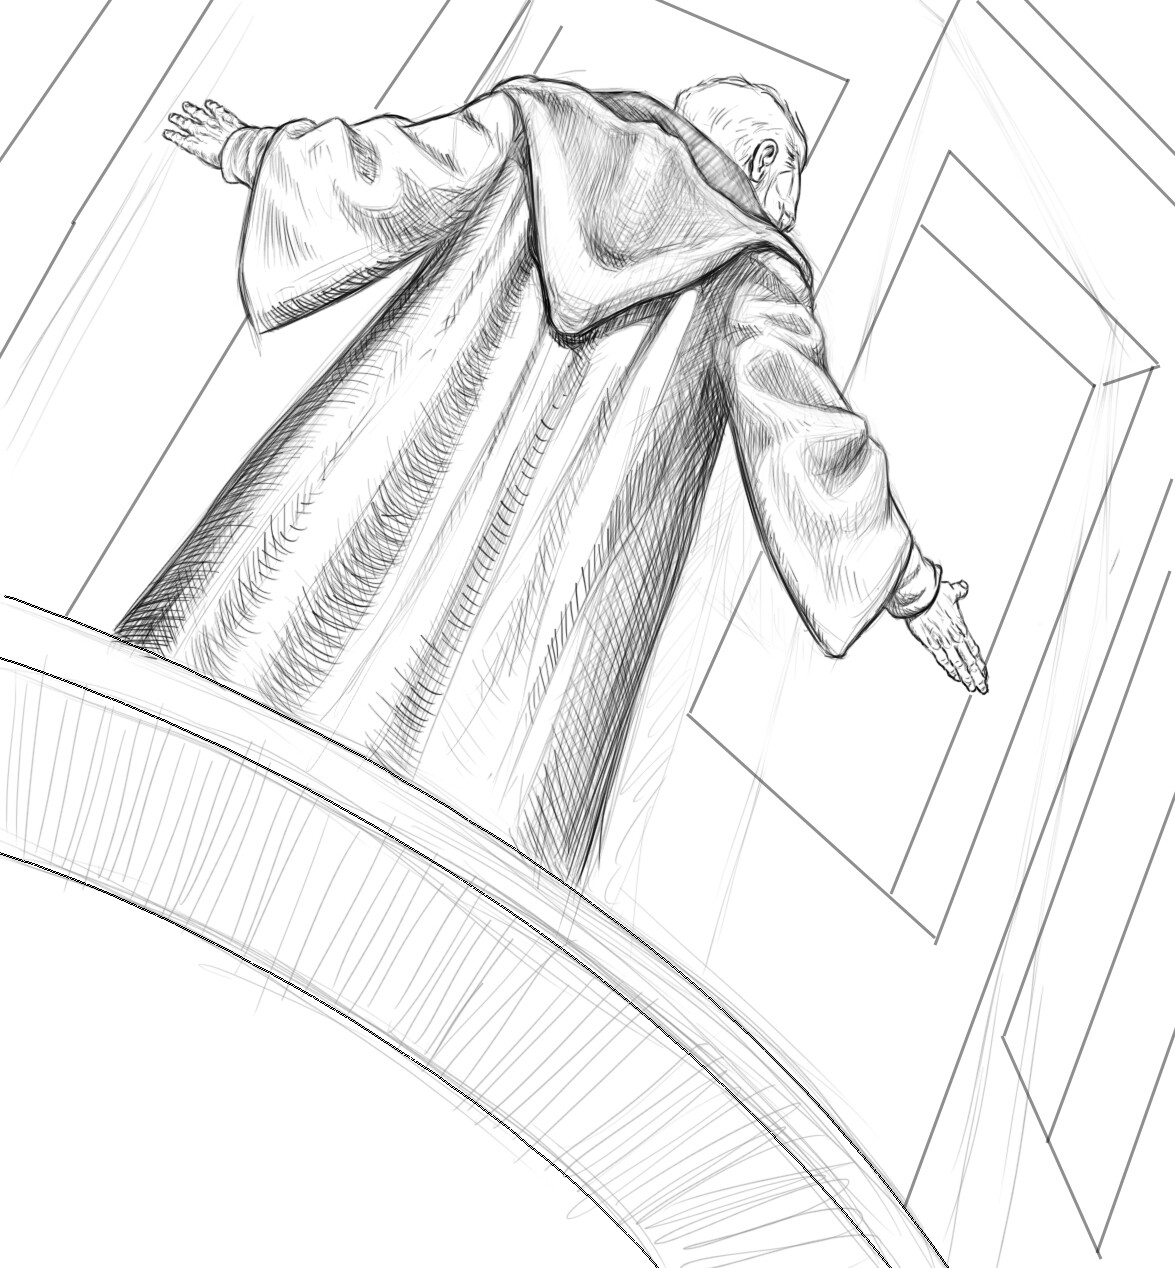
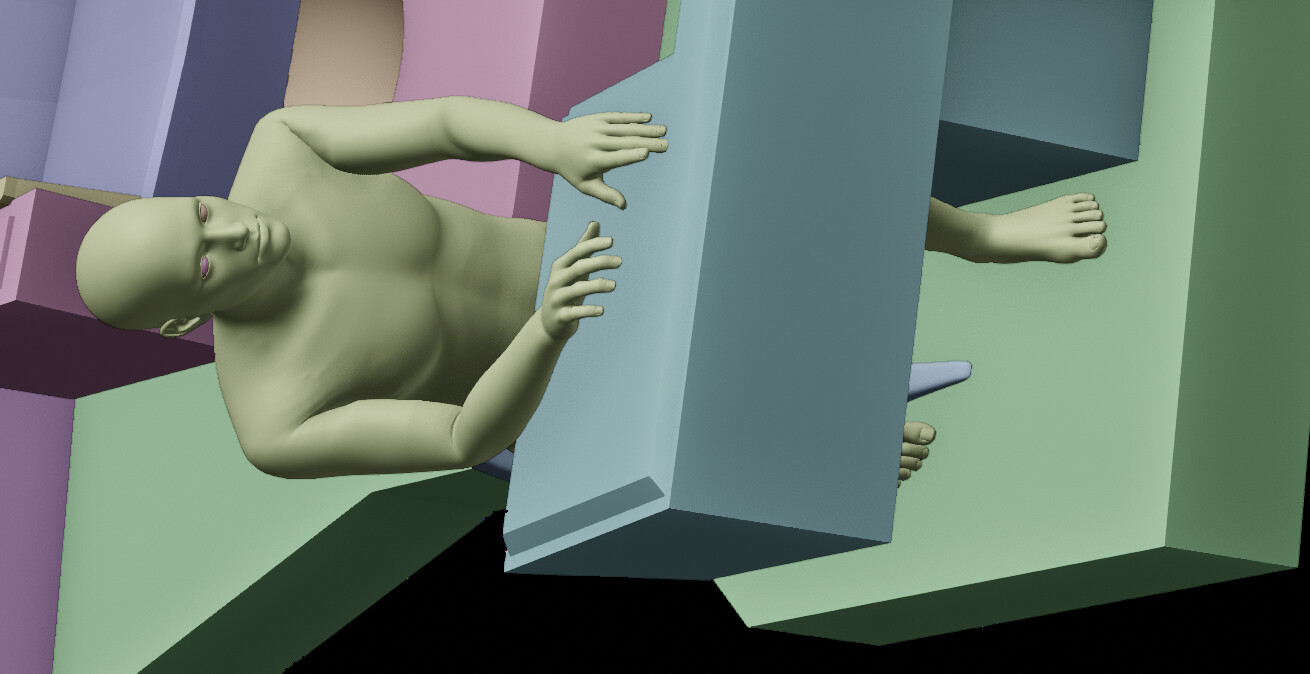
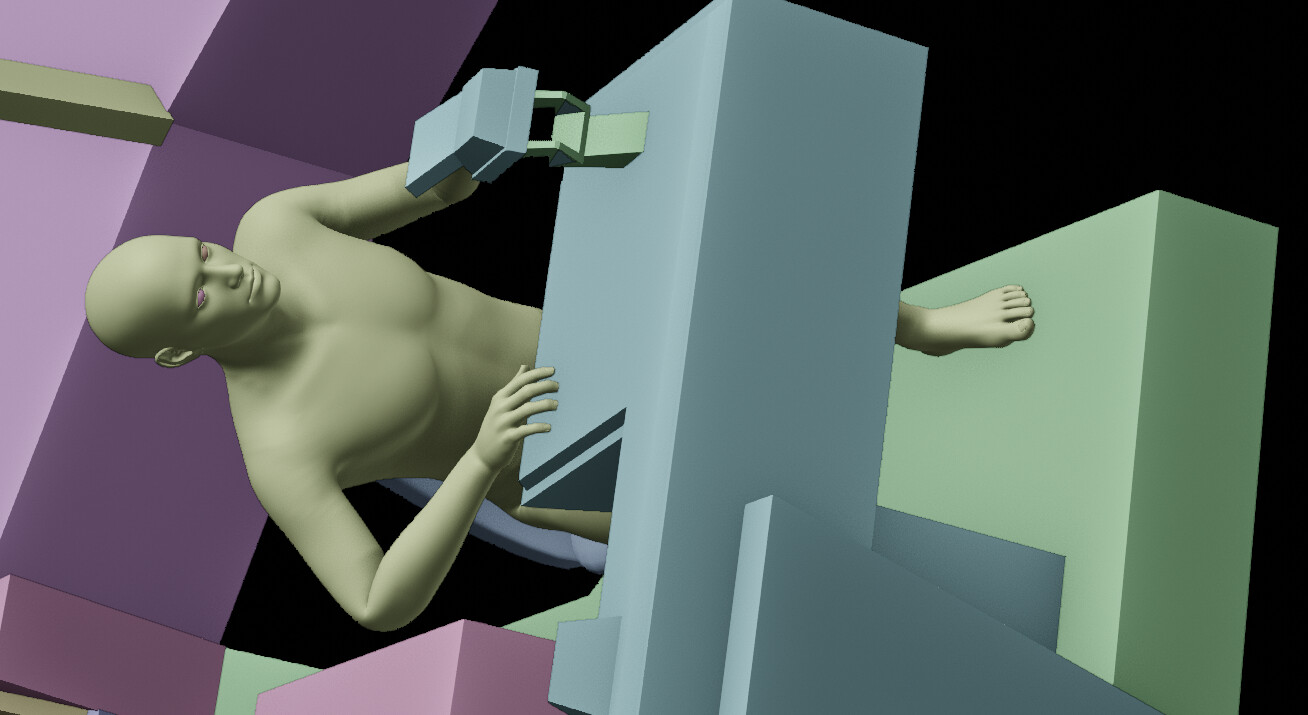
The Star Wars and Alien characters were all basically perched on a surface within their respective worlds so interaction with the rest of the environment was minimal. The Star Trek characters occupying the bridge were all going to be sitting in captain’s chairs or behind helm consoles while the characters in the transporter room were going to be in various stages of being “beamed down”, requiring them to be drawn in the actual environment.

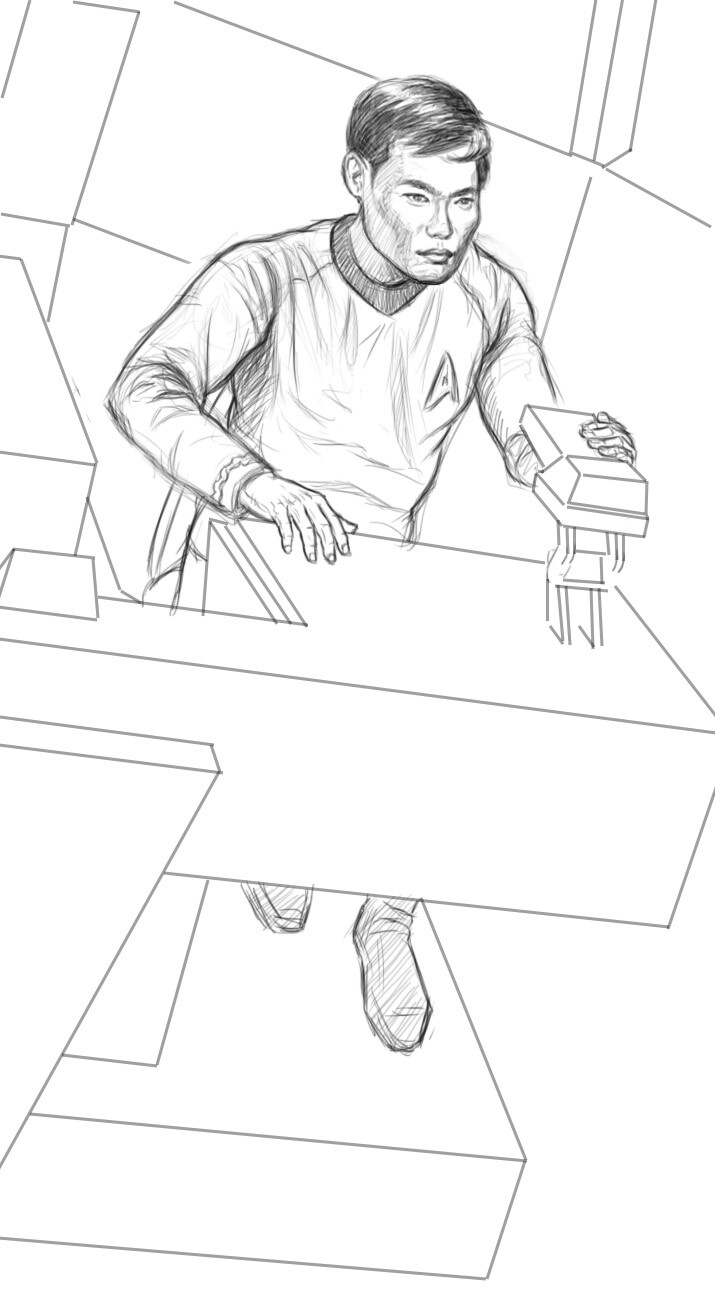
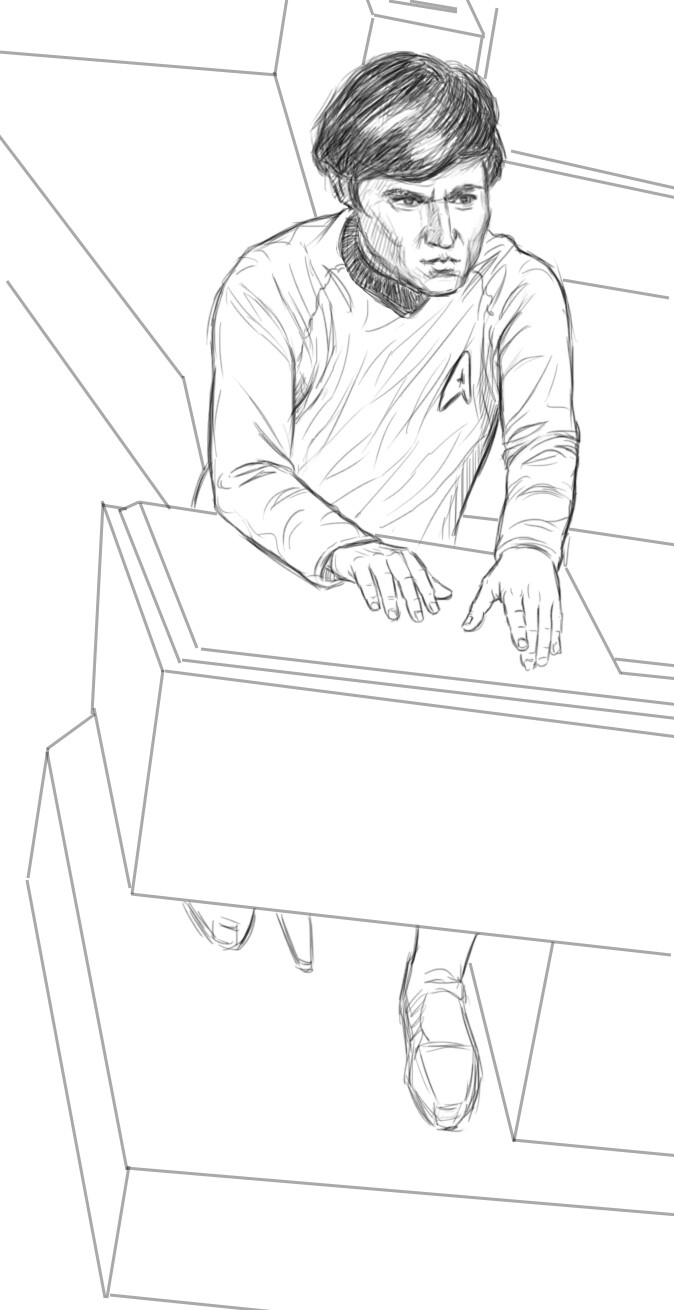
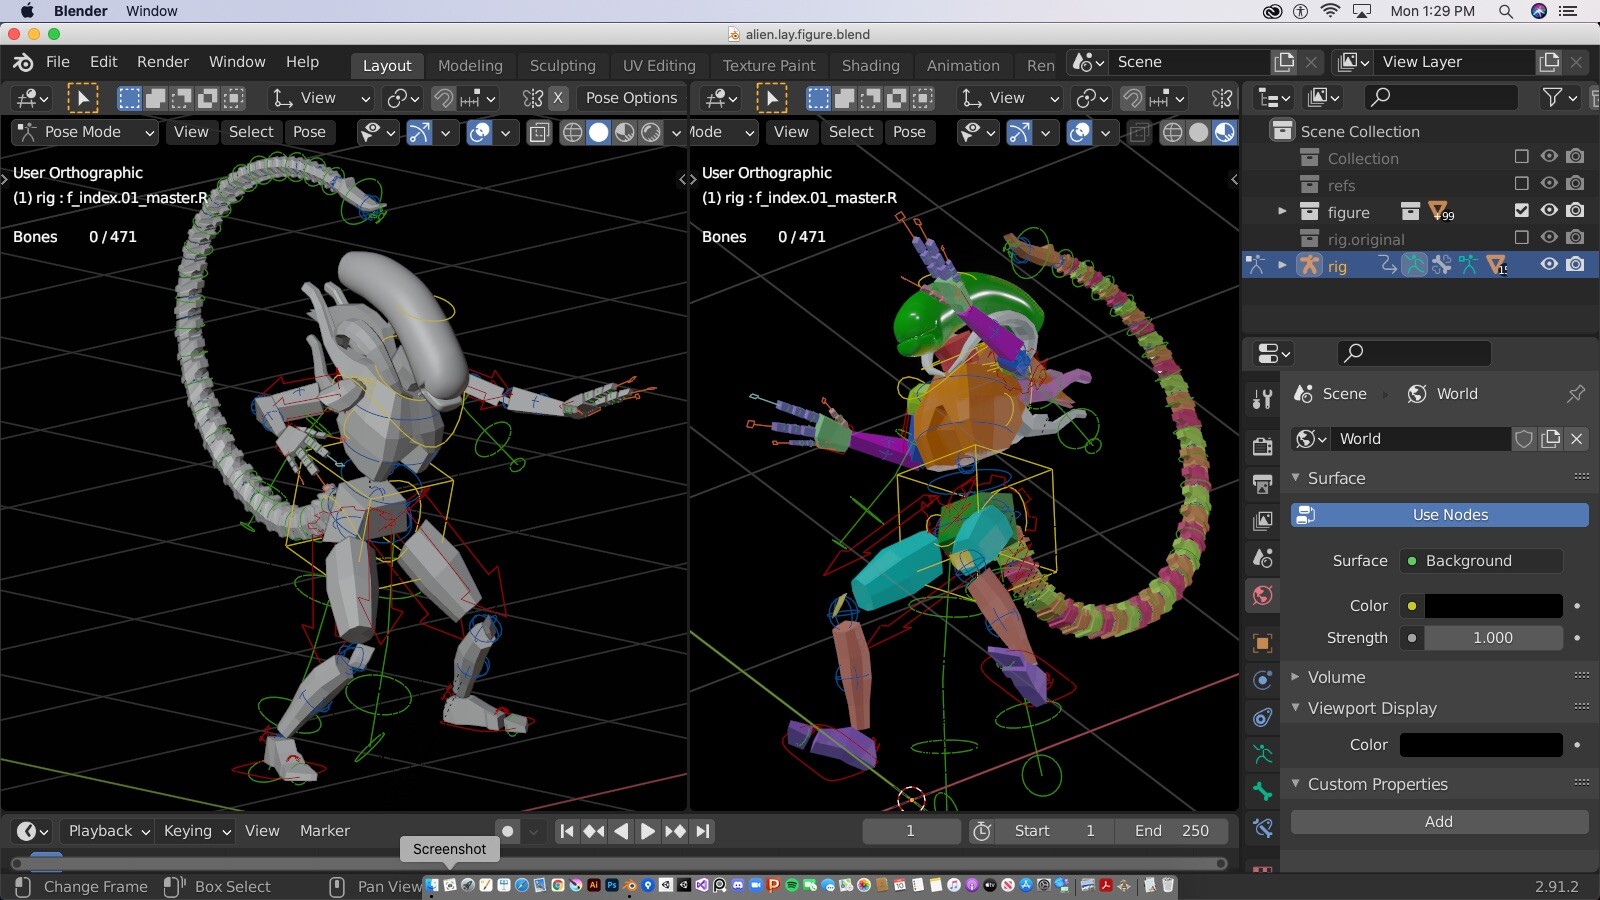
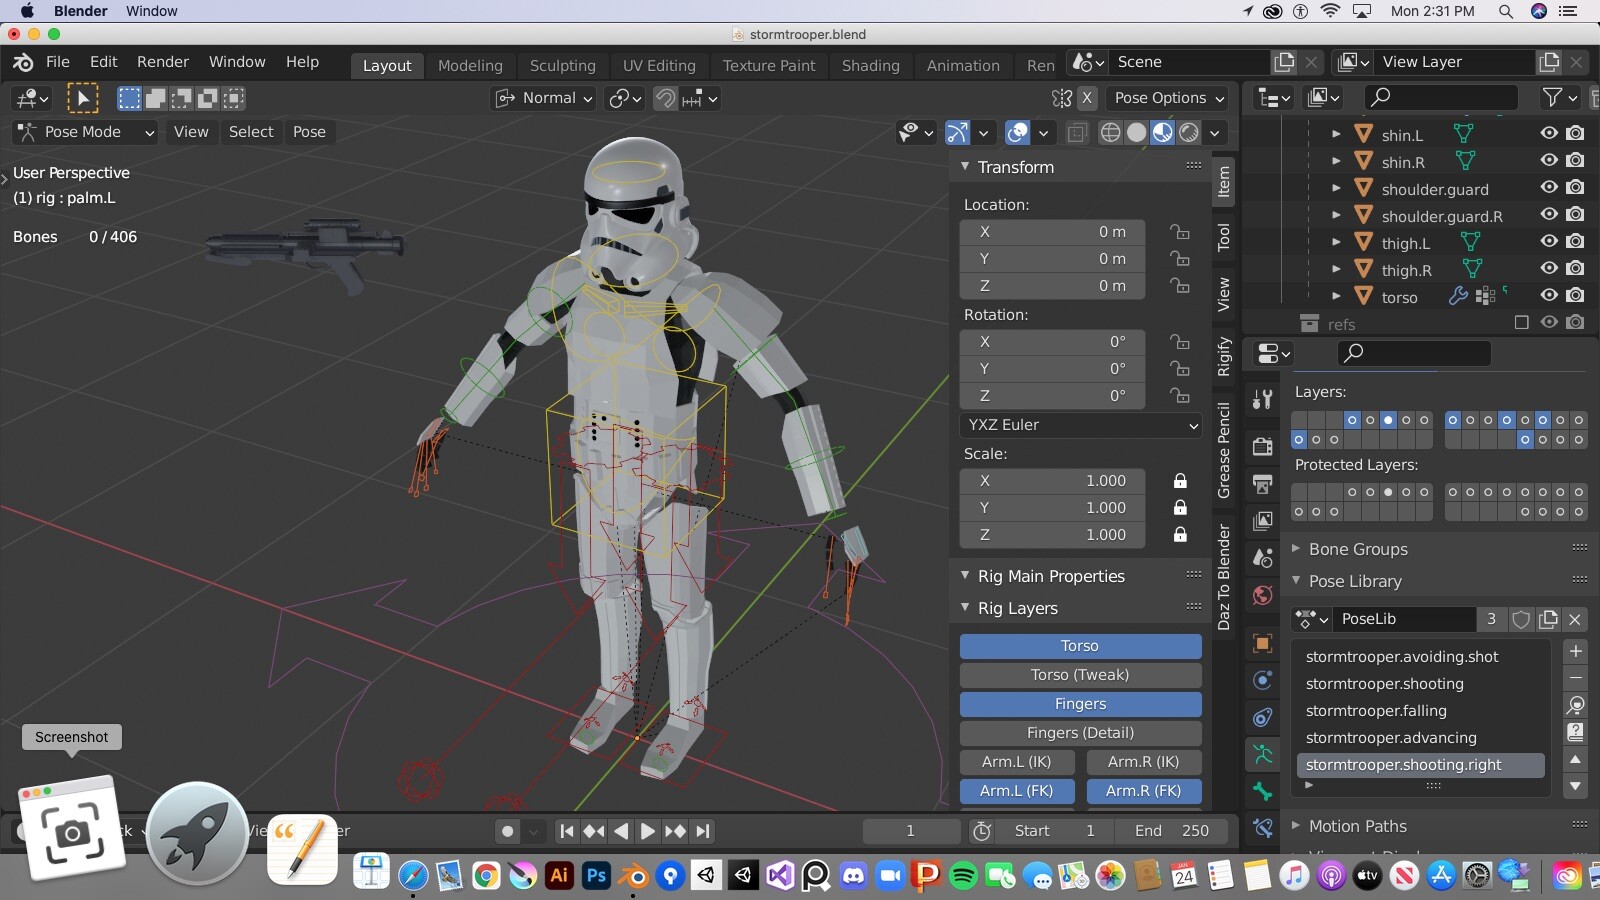
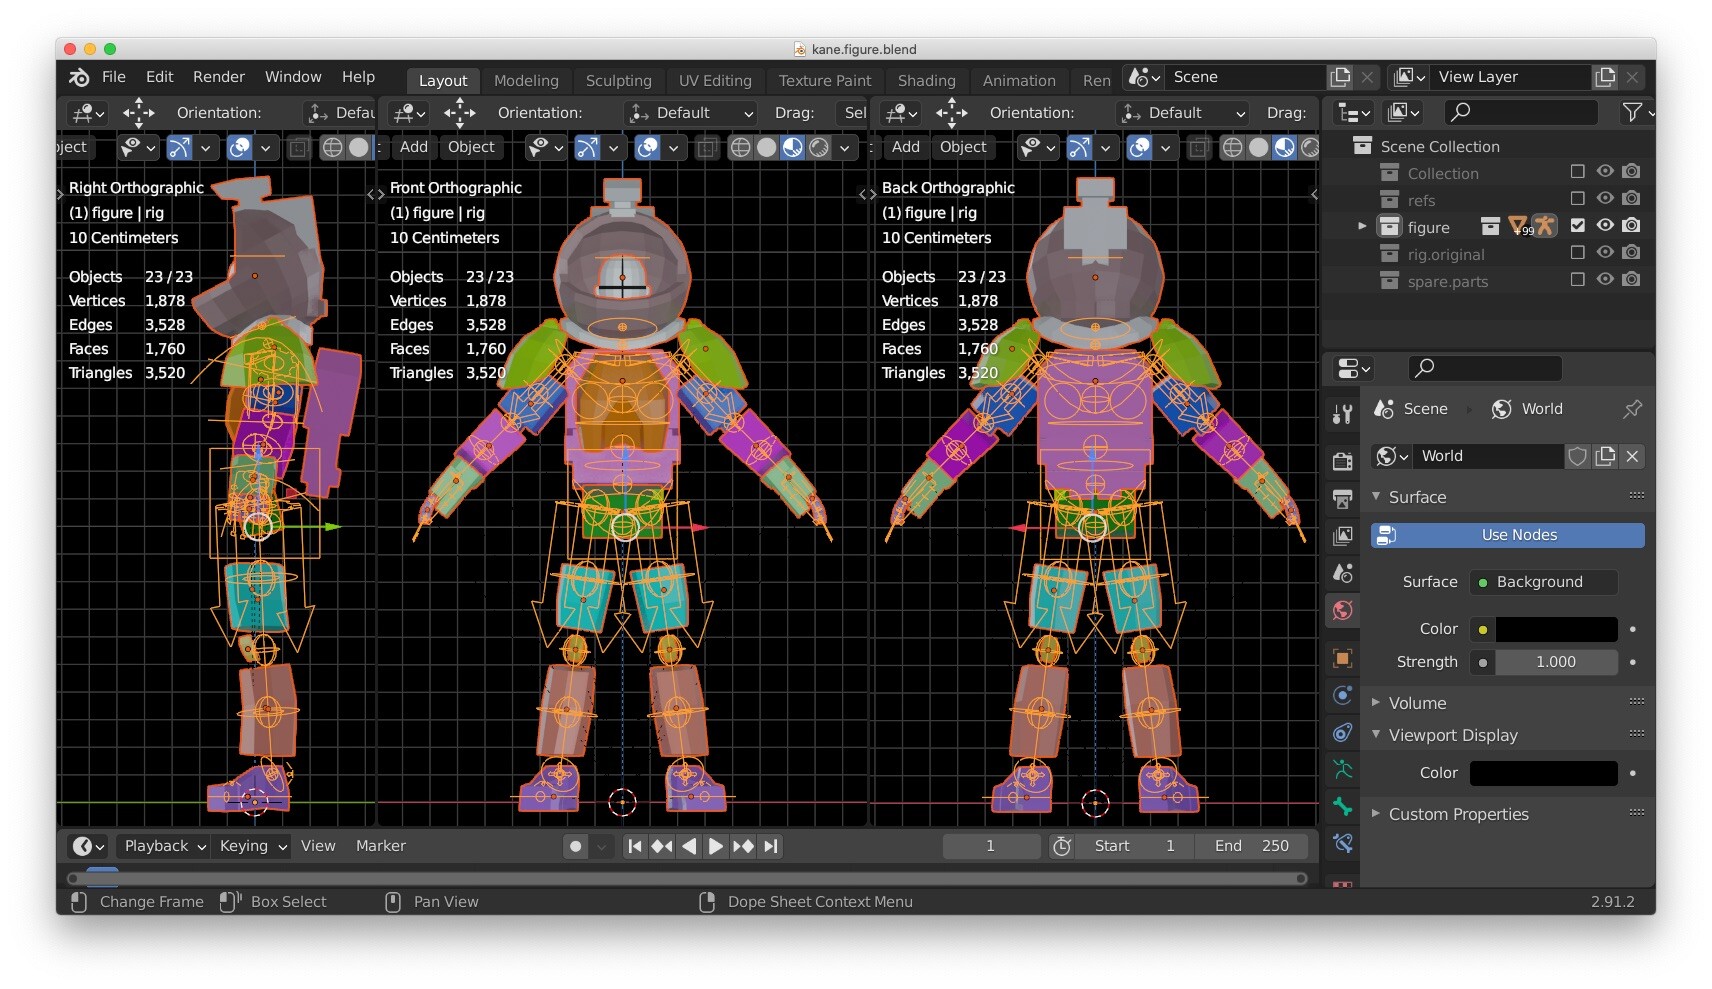
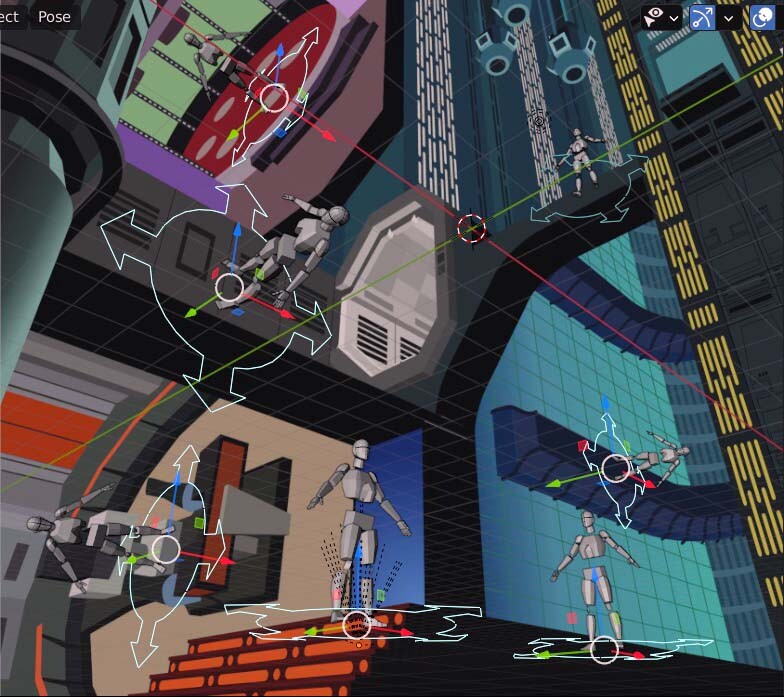
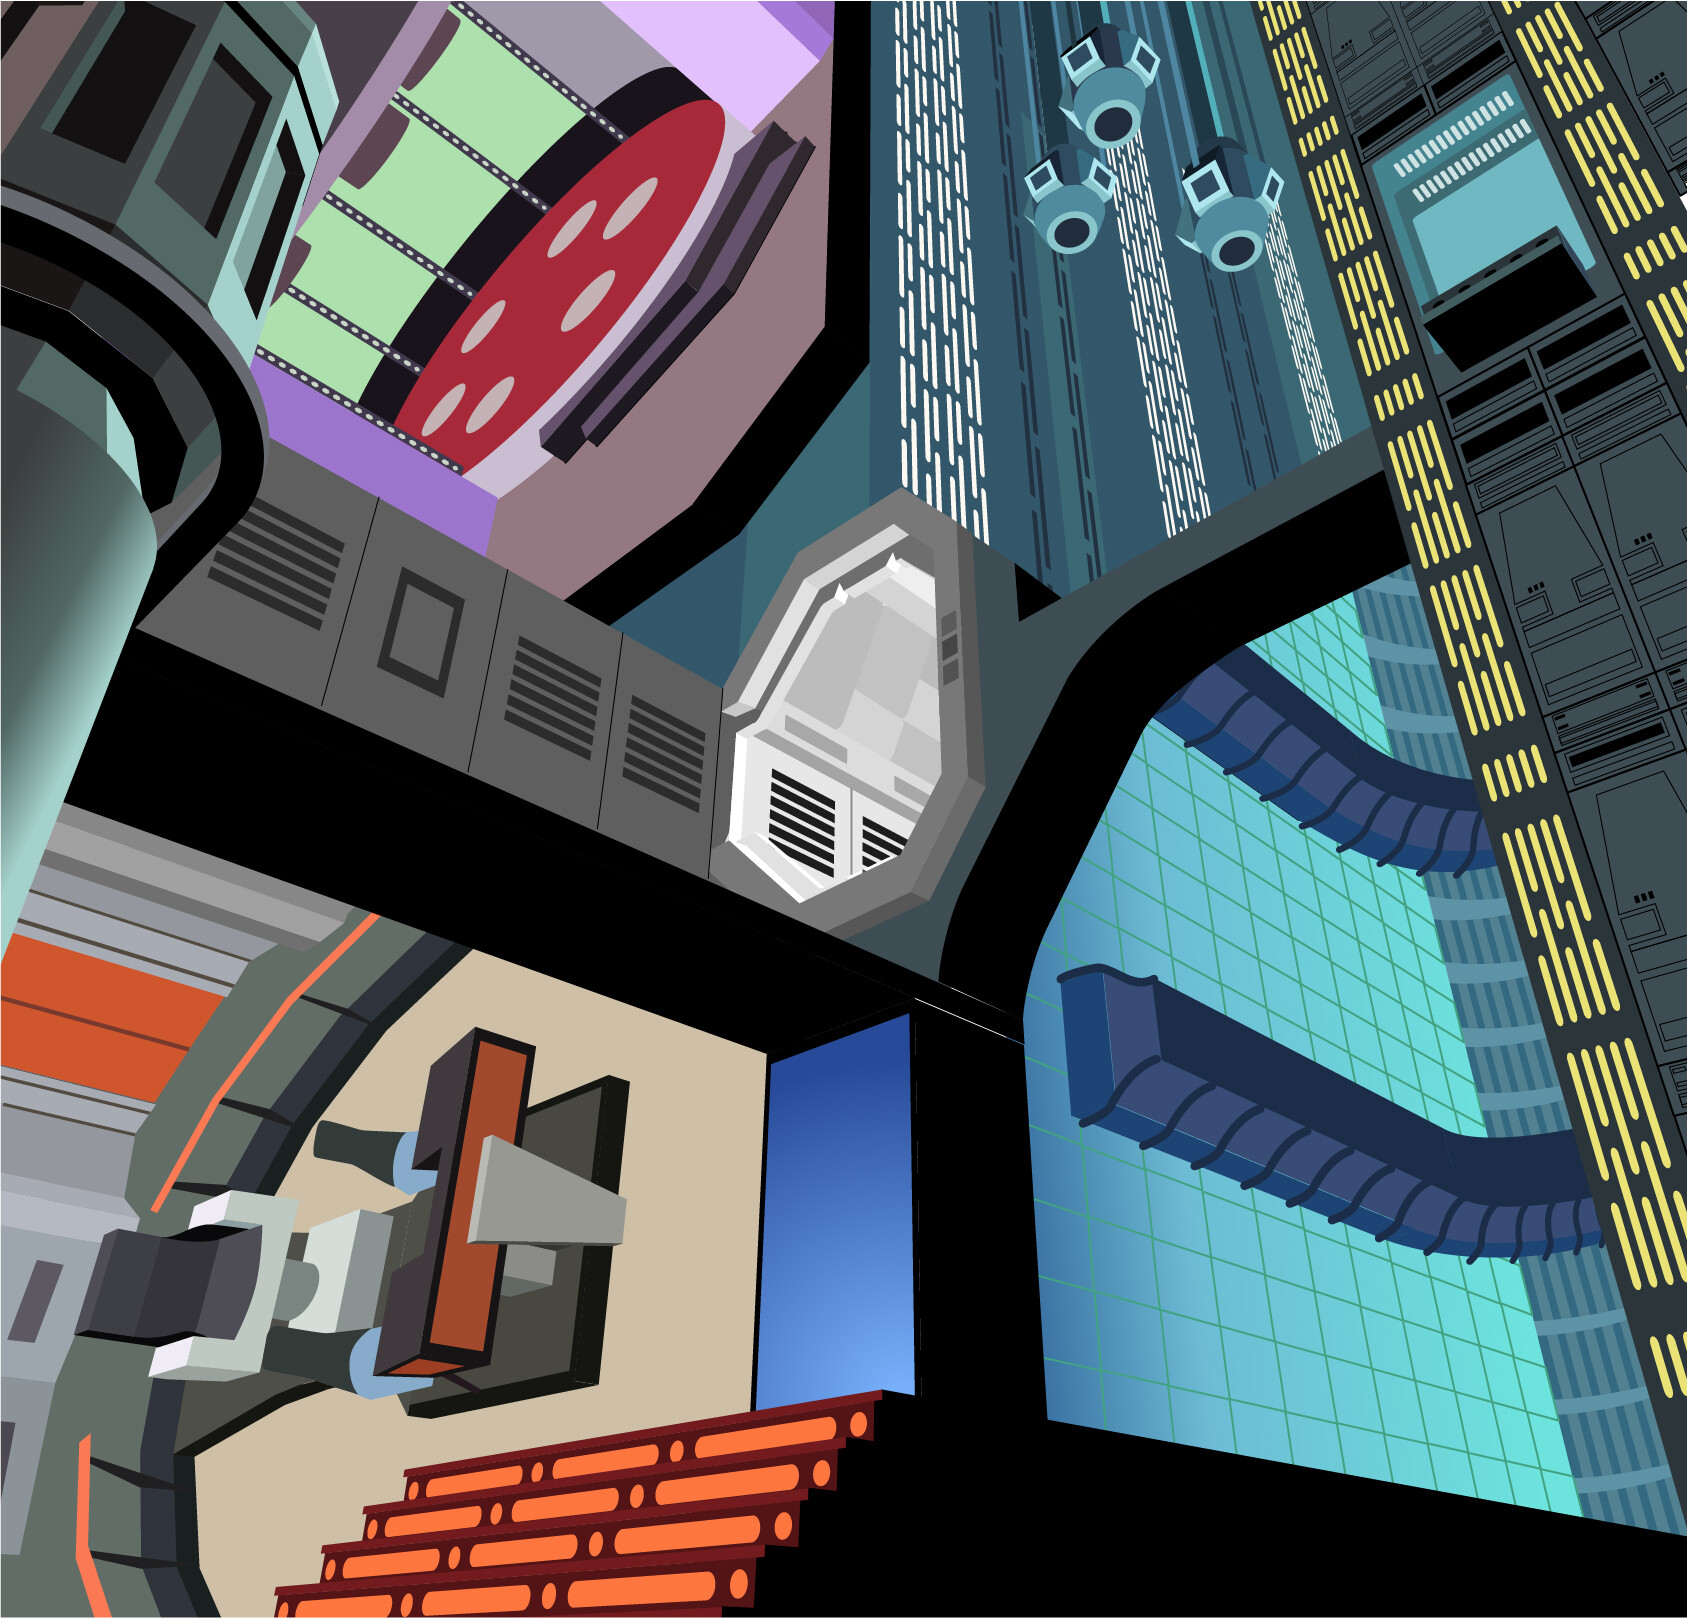
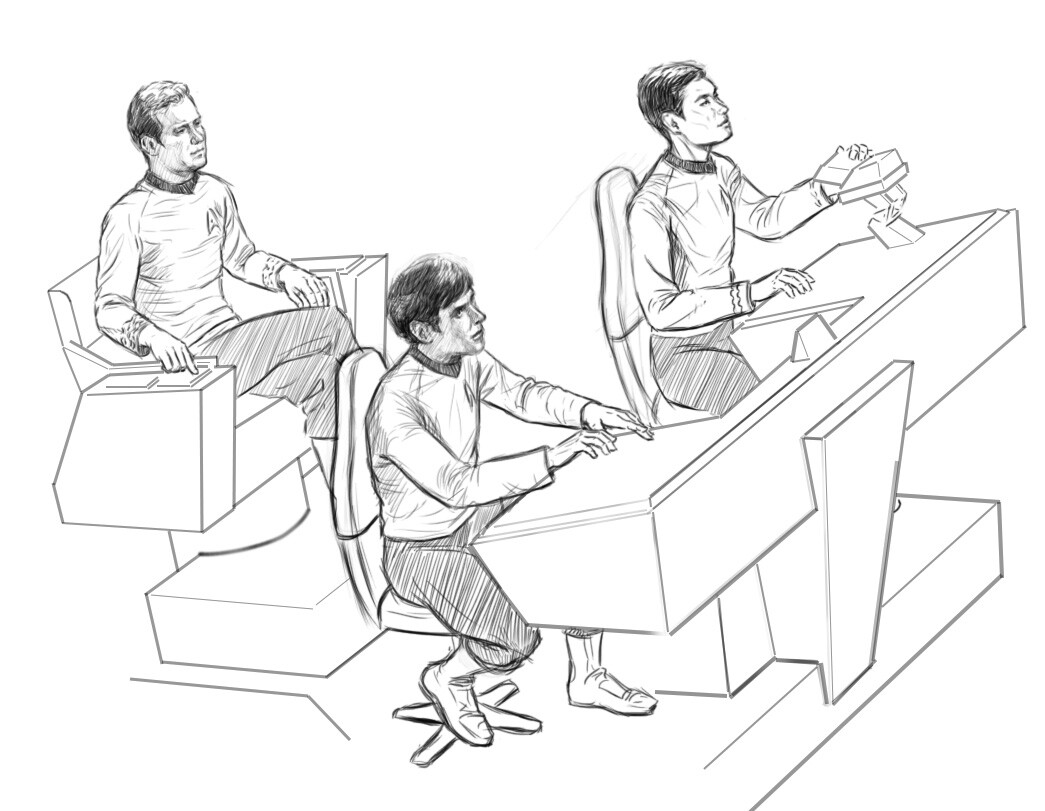
Using fSpy with Blender helped greatly in getting everybody where they were supposed to go, but retrofitting the renders coming out of Blender to the perspective grid in Adobe Illustrator still required some extra work. This was especially apparent with putting Sulu and Chekov at the helm—while being extremely rectilinear, just about all the surfaces on the helm console were cut to non-right angles so the more photorealistic perspective coming out of Blender needed some significant reinterpretation in order to get it to line up with the underlying Illustrator grid. Only then could the figures be seated behind it correctly.

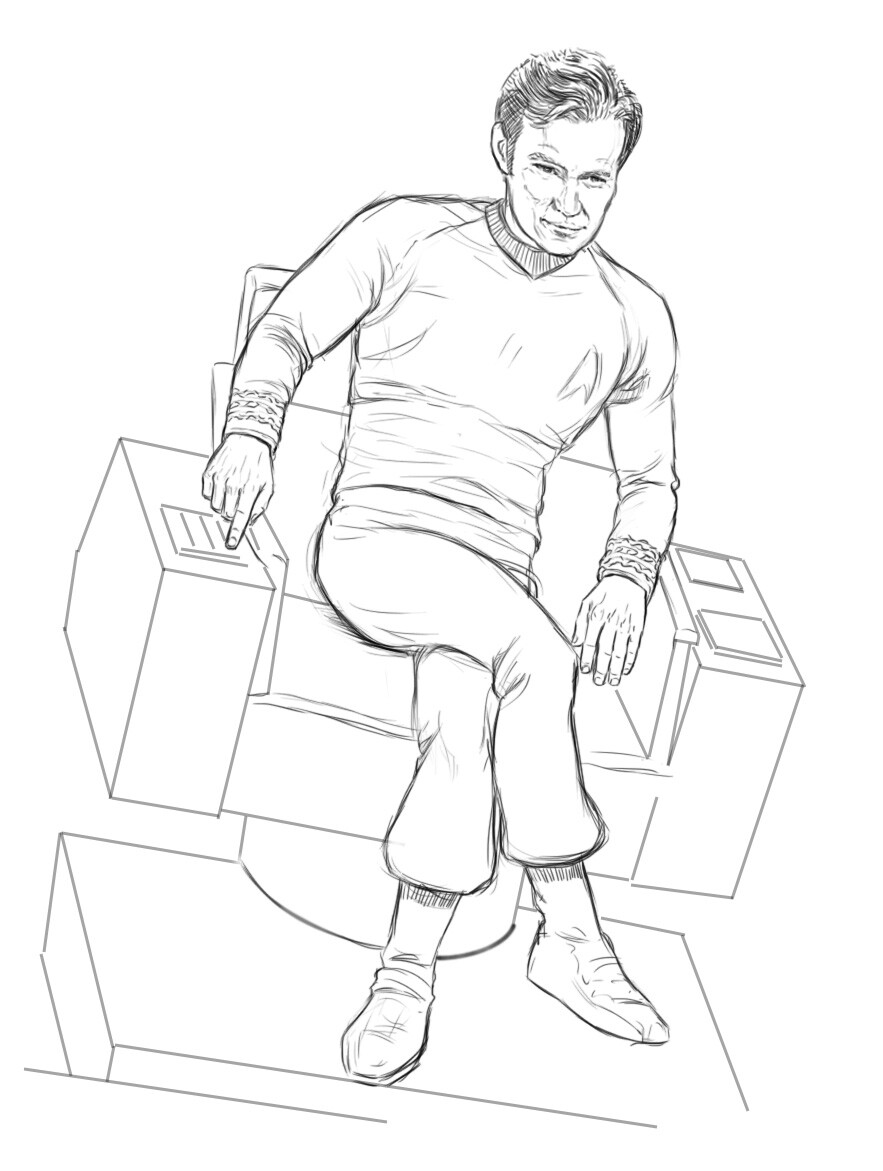
Kirk’s pose in the captain’s chair was important to get right for me—the casual way Shatner always had of crossing his legs and leaning one elbow on an arm rest was something I really wanted to get right because it was such an archetypal Shatner pose but before I could get him in the chair, I had to get the chair in the right place in the composition.


The chair design itself ended up being way more complex than I’d ever realized. I had never noticed the sloping wooden armrests on the inside of the instrument panels. Thankfully the internet provided some great reference material to get the structure right but it amazed me to see how the whole thing was put together.

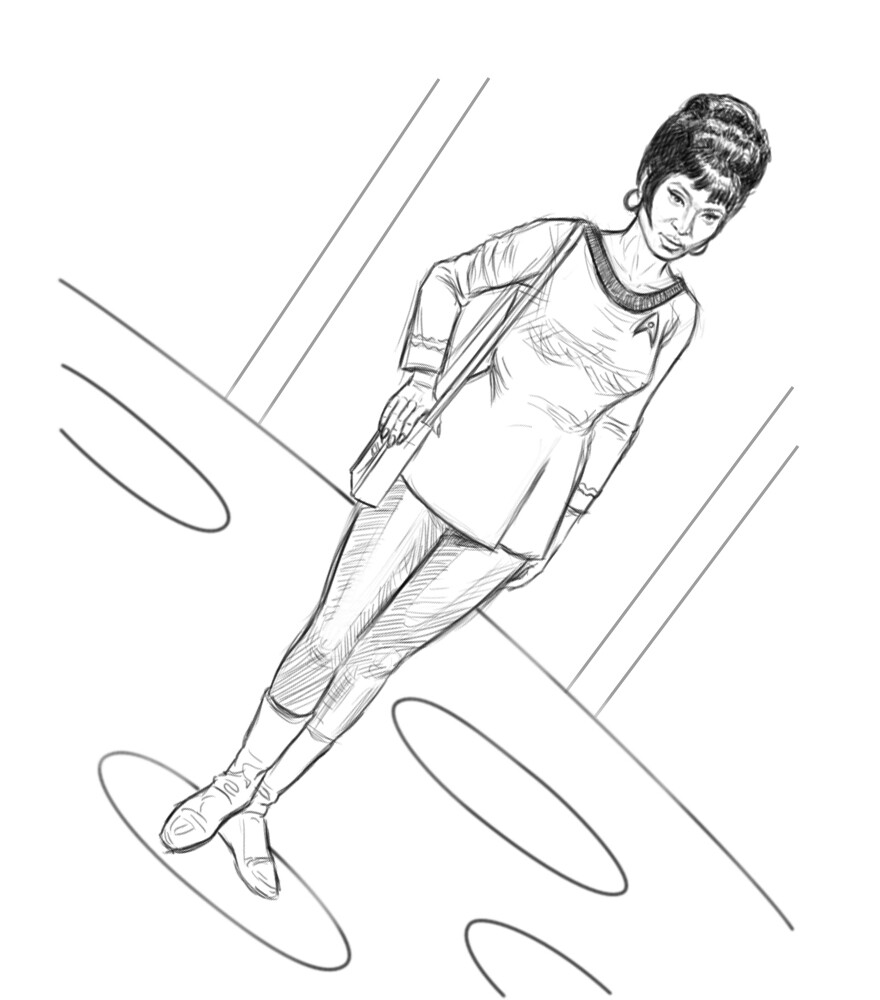
With the figures in the transporter room, I decided to draw them straight ahead and save trying to figure out how to create the transporter effect for when I was creating the vector art. All I had to do with them was adjust for the slight change in direction that putting them in a different location in the image required.


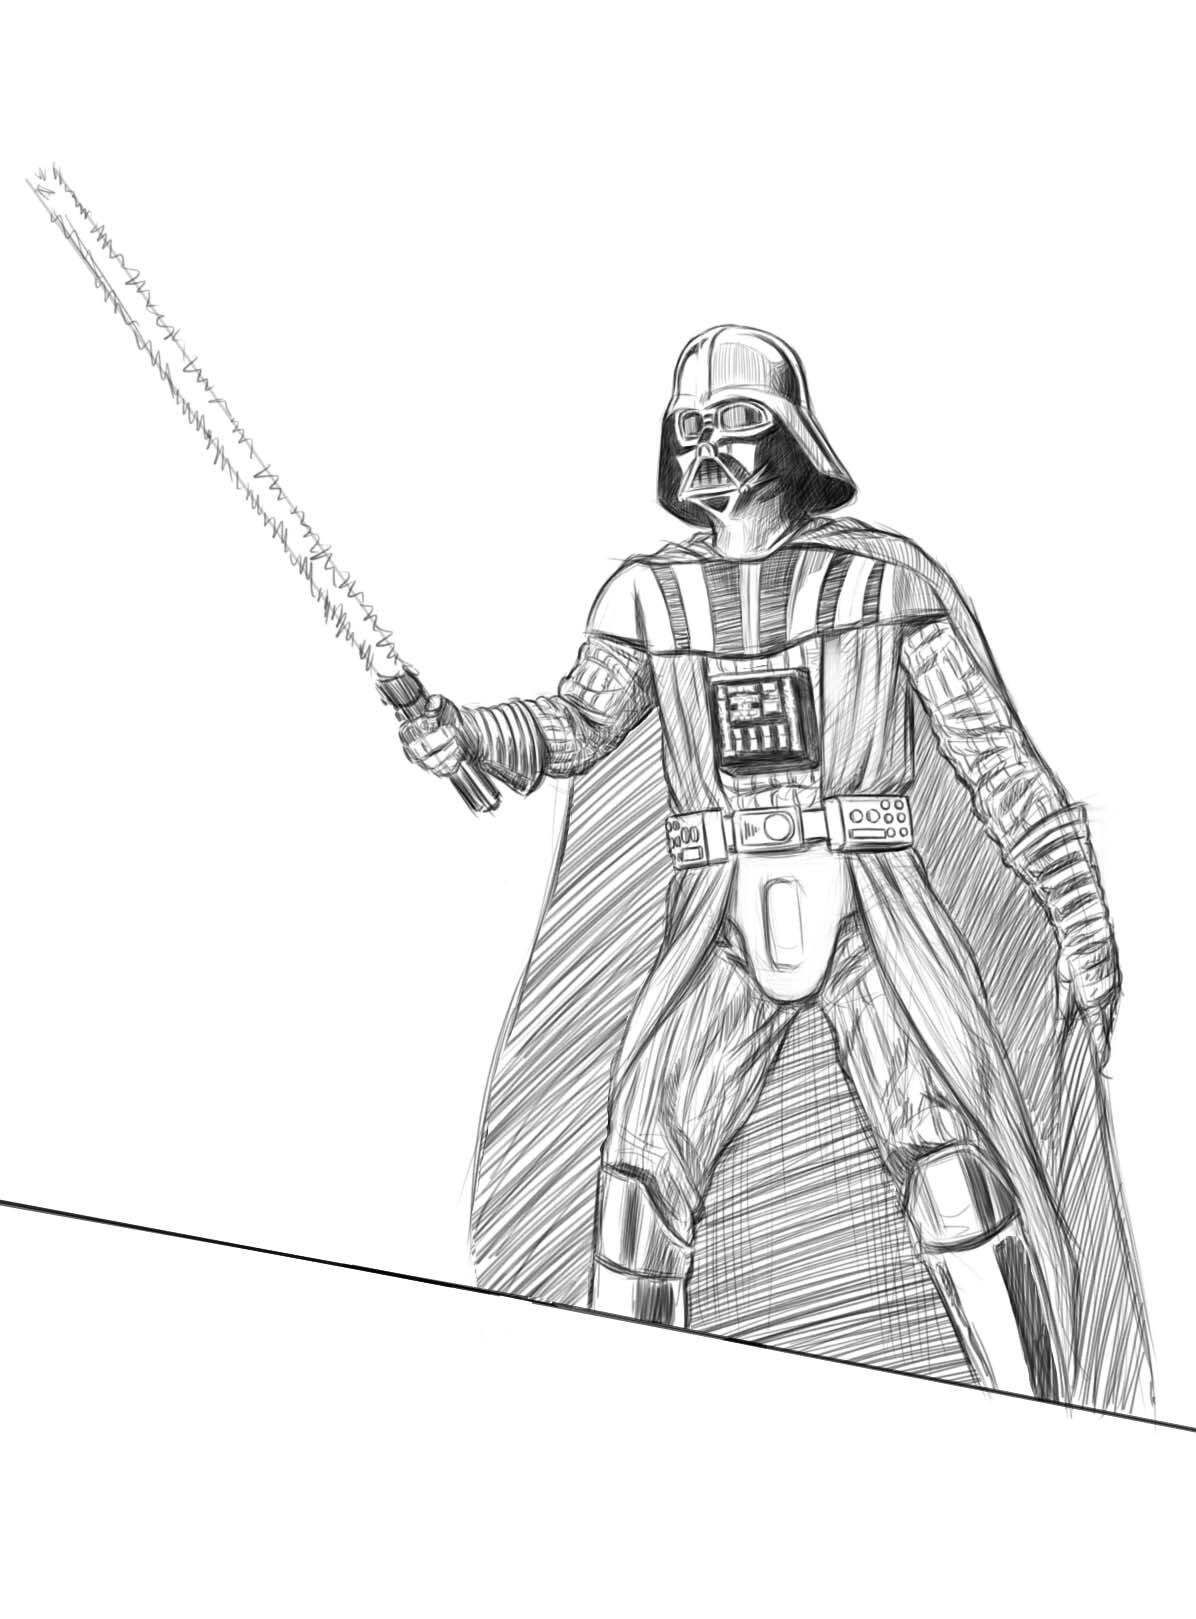
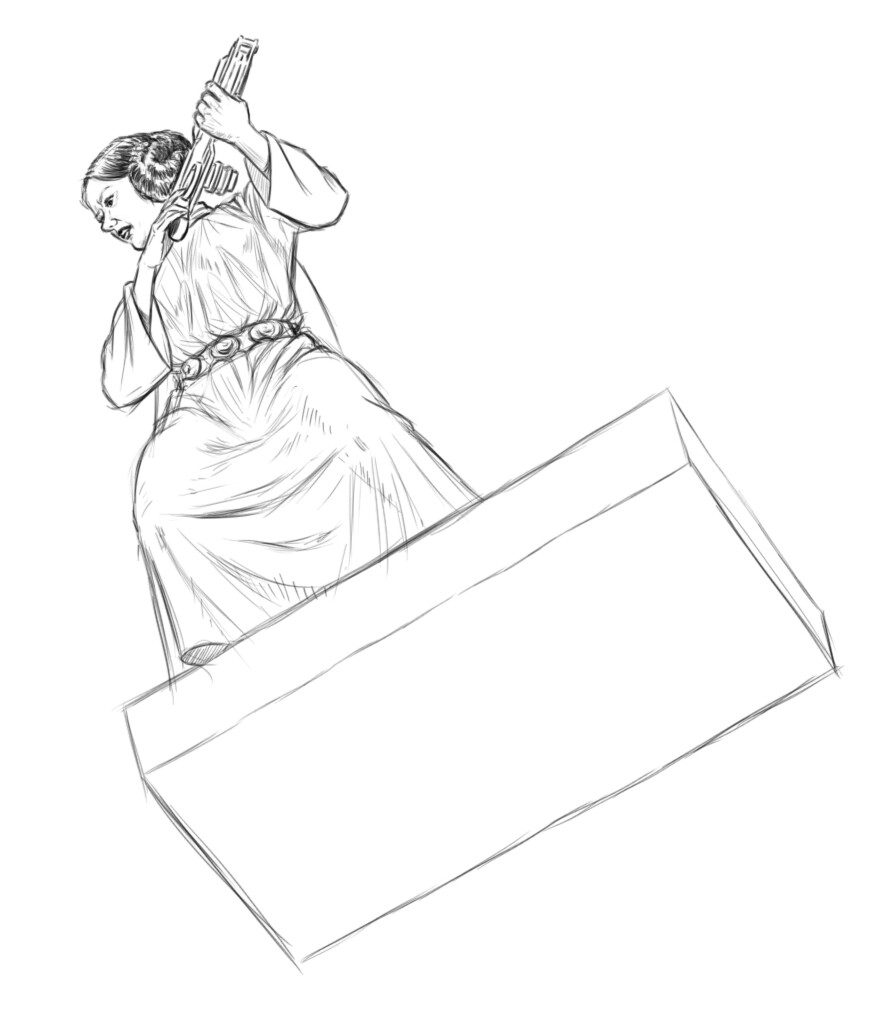
Next up were the Star Wars characters. Luke and Vader already seemed to be where they needed to be, but I still wasn’t too sure where I wanted to put Leia. 


Report

Three Worlds, One Image: Revising The Layout

Work In Progress / 28 April 2022

Adding the characters to the layout was simultaneously frustrating and inspiring—it was daunting to see the number of changes that needed to be made but seeing the way the space came alive by inhabiting it with the figures lit a fire under me to continue on. It was also reassuring to feel that the work I’d already done served to clarify the direction I needed to go. The layout I had didn’t work but it did show me the way I could fix it.

Flipping the Death Star tractor beam was an immediate improvement—it brought all of the Death Star characters together in the top right corner and freed up space for both the Enterprise bridge (which I was swapping out with the transporter room)  and the Alien in the upper left corner.

The two Star Trek areas benefitted from the swap. Not only was the relative space for each used with better economy but the orientation of the bridge benefitted from its new place in the perspective grid—the characters were seen more in profile, which gave them a more definite direction pictorially, if nothing else. The transporter room could now be drawn in the correct scale—I’d had to spread it out too much to fill its previous space.


Having a clearer idea of the way everything fit together helped to rationalize the space overall. My original layout had left the relative distances within each region a little too ambiguous which made it a challenge to keep the characters’ relative sizes consistent. Having a space that was working as a total space helped me to figure out exactly how big each figure should be to occupy the space they were in. This helped immensely with getting Luke and Vader’s sizes right at the bottom of the image and made me realize the Alien would have to be much larger than in the original layout. This was an added blessing because the top left corner was still a mystery to me. 

Since the new size of the Alien dictated that it was going to dominate its surrounding space, it was the one area of the image that seemed to demand I reverse my approach. I’d let the space determine the size of the characters everywhere else; in this instance, I was going to let the size of the Alien determine its setting. Now that I had a layout I felt confident about, I could get started on new, improved character sketches to fill it with.

Report

Three Worlds, One Image: Star Trek Character Sketches

Work In Progress / 14 April 2022

When I started out creating the character sketches I was assuming they were simply going to serve the purpose of clarifying how the figures would look in the perspective they’d have in the final composition, but they ended up serving an even more important purpose in revealing the flaws in the basic structure of the larger image itself. This had already become apparent when I was drawing the Star Wars characters and continued on through drawing the characters from Star Trek.

With the Star Wars characters, the underlying flaws that were being revealed were more about how readable a given character would be from a given viewpoint and the problems became apparent almost as soon as I began to draw them. The problems the Star Trek characters revealed only became apparent after I drew them all and placed them in the larger image.

I started out being preoccupied with getting accurate likenesses of each character, which immediately felt like a higher priority for them than it had been for the Alien or Star Wars characters. The differences in the way characters are depicted in film as opposed to television (especially TV from the 60s, when color TV was still a relatively new technology) not only visually but in the balance between action and dialog, made handling the TV characters feel like a very different thing.

The poses of the Star Trek characters demanded to be far less dynamic than the Alien and Star Wars characters. So much of what goes on aboard the Enterprise in the original series happens primarily through dialog—it’s only when they beam down to a planet surface that all the Vulcan pinching and Kirk Fu goes on. The archetypal Enterprise bridge or transporter room sequences both always seemed to be very still (the transporter room especially, since they had to use a still image to create the transporter VFX.)

The other huge difference that didn’t have immediate implications, since I was still drawing sketches in B&W but was already starting to itch at the back of my mind, was the difference between cinematic lighting and 60s TV lighting. The lighting from that period of television history had to be relatively uniform, where film could use light in a complete tonal range—you could go from silhouettes to floodlights and everything in between in film and use it to create depth and volume as well as atmosphere. With TV lighting at that time, it was a challenge just to get everything to “read” on the screens that were available at the time. The lighting, costume and scenic designers on shows like Star Trek and Batman did some absolutely ingenious things to get as much out of their resources as they could.

The contrast between the TV and movie worlds wasn’t really a problem—if anything, it was going to serve to clarify what character came from which world in the final image—but I still wanted everything to harmonize as a whole, so integrating everything into a nice visual rhythm was going to take some doing.

I ended up being relatively happy with the drawings of the Star Trek characters themselves, but adding them to the final image forced me to confront the fact that the underlying structure just wasn’t working as well as it needed to. I was going to have to go back and tinker with the original layout now that drawing the characters gave me a clearer idea of where everything and everyone needed to be.

Report

Three Worlds, One Image: Preliminary Star Wars Character Sketches

Work In Progress / 07 April 2022

Creating sketches for the Star Wars characters was about as straightforward a process as it was for the Alien characters, though I still had some uncertainty as to how I was going to handle the placement of the tractor beam and even how many times I was going to use a character. 

My original conception had been to show Luke twice in the same image (a holdover from when I was first conceptualizing the image and thought about showing one event from 3 different angles at once), showing him walking up the stairs for his duel with Vader and also swinging with Leia across the Death Star chasm, but the placement of the Death Star chasm in the image made the character posing too awkward for me to use the idea—Luke and Leia would be seen from some such an extremely low angle that it would be almost impossible to read what was going on. It ended up being addition by subtraction; using a character twice seemed like space that could be better used for another character, so I decided to use the Death Star chasm as a showcase for Leia shooting stormtroopers.


I originally wanted to have Leia standing on the platform nub that the walkway across the chasm shoots out from. It was a nice, dramatic angle that was going to give me the opportunity to draw her from an interesting vantage point with a lot of foreshortening. A couple of stormtroopers would be advancing toward her along another walkway.


This seemed like a workable idea in the thumbnail stage but working up more fully-realized drawings soon showed that the way the space was designed was going to make it difficult to show everybody shooting in the directions they were going to need to be shooting.

While I liked the drawings individually, they showed me that I was going to have to go back to the drawing board and figure out exactly what I wanted to do with the space on the Death Star part of the image before I could start populating it with characters.

One of the moments that had stayed with me from the very first thumbnail I drew on this project was showing Ben Kenobi turning off the tractor beam. I was always thinking of placing him in a dark corner to make him seem as stealthy and surreptitious as the moment in the actual movie, but I still wasn’t sure if I’d picked the right corner. I managed to wrestle my way through some preliminary attempts at fitting the tractor beam into the upper left corner but it still wasn’t settling in for me. I was hoping working on the character sketch could give me a better idea of whether or not the idea would work at all.


I discovered another new challenge the second I started Ben’s character sketch: his robe was going to make him very hard to read as a figure in the extreme foreshortening that I was going to have to use in that part of the image. Getting even a sliver of his face to be visible behind his shoulders and the lowered hood that protruded out from behind his robe wasn’t going to be easy. I managed to come up with a pose I liked and the drapery study of his robe was a worthwhile thing to explore but, just as with Leia and the stormtoopers (which would make a great band name, btw) Ben’s character sketch revealed a weakness in the design of the space in that part of the image that was going to have to be addressed before I could start adding figures to it. 


Report

Three Worlds, One Image: Creating Reference Figures in Daz 3D and Blender

Work In Progress / 24 March 2022

Discovering the fSpy add-on for a Blender was a huge step forward in being able to create 3D reference material. Now it was time to start making some quick figures in Blender that could be posed and placed in the correct positions so that I could draw everything in the correct perspective.

Most of the figures in the image were human (or at least humanoid) so importing a couple of basic male and female figure meshes from Daz 3D into Blender seemed like the easiest way to go. While Daz 3D and Blender are somewhat compatible, exporting a usable rig from Daz 3D into Blender ended up not being possible (it may be for PCs but not for Macs.)

My first idea was to pose each figure in Daz 3D and then export the resulting mesh into Blender for placement, but that ended up becoming too cumbersome—any change in the pose required me to completely retrace my steps and juggle between the two programs. The best option seemed to be to export a mesh from Daz 3D in the standard T pose into Blender and then create the rig from there.

One of the main benefits I’ve always received from working on personal projects, over and above the creative satisfaction I get from them, is that they have a great tendency to require me to learn something brand new or deepen my knowledge of something I’ve been only superficially familiar with beforehand.  This project had already given me the chance to really get to know Illustrator’s perspective grid, a tool I’d used often on illustration assignments but in a very quick, obvious way. I was now going to have the chance to get into the nuts and bolts of using Blender’s Rigify armature to create rigs for these reference characters.

I’ve created all my own rigs for characters I’ve created in Blender from the ground up, adding each bone myself, and while I loved the control that approach gave me (and the understanding of exactly what the different layers of deform and mechanical bones do) it was always very tedious and time-consuming to create each rig from scratch. I’d played around with Rigify before but had never used it with any kind of focus or ever went in “under the hood” to see how everything worked together but the prospect of a usable rig being created automatically was something I was going to need to have for an image that was going to include 14 figures.

I lined up all the bones of Rigify’s metarig with the meshes I imported from Daz 3D and, with the exception of a tweak I had to make to how Blender was tracking the base bones of each finger, the rig it generated was everything I needed it to be—even the face rig worked well! This was an even bigger step in the right direction than discovering fSpy had been. With 2 base figures I was able to create reference poses for 10 of the 14 figures and have them placed in the correct place in the image, in the correct position, as easily as it was for me to think of them.

The next challenge was to create meshes for the characters that had a little too much going on for the standard male and female base meshes I imported from Daz 3D. The xenomorph from Alien was the most obviously non-humanoid character I was going to be dealing with, but the spacesuit Kane is wearing in Alien was also too complex to simply “draw around” a base figure. The same was true for Darth Vader and a stormtrooper from Star Wars—their helmets alone were going to require some work to get them looking right.


There were also a number of props that I wanted to include, most notably the box Ripley from Alien carries Jones the cat in (as well as her flamethrower) so I needed to model some props as well as characters and integrate them into each rig so they could move around with the characters.

I was able to quickly block in Kane’s spacesuit with simple boxes and created blaster for Princess Leia and the stormtrooper, a belt and holster and a lightsaber for Luke, and a quick hood reference for Obi-Wan.


The next step was to render out the reference figures and create more full realized character sketches in Photoshop from them.

Report

Three Worlds, One Image: Photo Matching With fSpy

Work In Progress / 17 March 2022

Now that I had the environment relatively well established, it was time to start adding some figures. While the space was really going to be the “star” of the image, the figures were going to be crucial, not only to give a clear indication of the direction each of the 3 worlds was pointed but also to make each of them immediately recognizable. The transporter room from Star Trek was going to look a whole lot more like the transporter room from Star Trek with Spock and Uhura standing in it.

The unnatural perspective was going to make drawing figures that fit comfortably in the space an unusual challenge. It can be difficult enough to draw figures in conventional perspective but having many of them rotated 90 degrees in either direction from the upright axis was adding an extra level of difficulty. 

I discovered the 3D package Blender a few years ago and became absolutely obsessed with it. It is enormously powerful software that enables me to create just about anything in 3 dimensions and I’ve used it often in my professional illustration work, primarily to create quick, basic low-poly models of things like cars and appliances to use as reference for more  fully realized images created in Photoshop and Illustrator.  While the Blender-to-Photohsop/Illustrator workflow worked just fine for more conventional images, in order to create 3D references for this image I was going to need to work backwards: bring the 2D image of the space I’d created in Illustrator to use as a reference for the 3D reference figures and objects I’d be creating in Blender. This was going to necessitate finding a way to make the virtual camera in Blender match the perspective that I’d already established using the 3-point perspective grid in Illustrator and that wasn’t going to be as easy as it might at first seem to be.

Blender’s virtual cameras attempt to simulate real-world cameras as closely as possible, calculating things like focal length, f-stops and depth of field to match real-world conditions as if you were looking through a real camera and not a computer screen. Illustrator’s perspective grid doesn’t try to do any such thing: it essentially automates the creation of the same kind of linear perspective that artists developed during the Renaissance. While this kind of perspective was revolutionary in enabling artists to create a sense of 3-dimensional depth on a 2-dimensional surface, it’s still an abstraction from the real-world visual experience and while it was exactly what I needed for the image I was creating, getting it to play nice with Blender’s cameras was going to require some work.

Thankfully, I discovered a great add-on for Blender called fSpy that handles photo-matching: using information from a source image like a photo or drawing to place Blender’s virtual camera in the position it would need to be to see the objects in the image from that vantage point. I imported the Illustrator layout into fSpy and lined up fSpy’s reference axes with strong diagonals in the image and fSpy created the camera I could then use in Blender to get everything working together. The camera still doesn’t match up perfectly with the base image—it still attempts to create a real-world view from that vantage point—but it was definitely an enormous step in the right direction to help me create useful reference figures in 3D space that I could use to create final drawings of the figures in Illustrator.

The next challenge was to create the reference figures themselves in Blender.

Report

Three Worlds, One Image: Adding Color

Work In Progress / 10 March 2022

After getting the basic structure down, I wanted to quickly add in some color to get a feel for the way each of the spaces would work together. I was going purely for the local color of everything, not wanting to get bogged down in considering lighting or texturing. Working with original material that was already so brilliantly designed and iconic made it easy to set each of the 3 worlds apart and make them immediately recognizable.

Adding color immediately made me aware of a problem area that took me quite a while to solve. I had liked the idea of showing Ben Kenobi turning off the tractor beam from my initial sketch—I immediately visualized having him sort of sneaking around in the shadows, a figure you may not initially notice with everything else going on, so having him to the side or a corner made a lot of sense. I had placed him on the left side of the original sketch, away from the other Star Wars parts of the image, which at first seemed like a good way to do a “Where’s Waldo?” kind of thing with him but the placement felt awkward. 

When I started designing the basic structure, I moved the tractor beam all the way up into the top left corner, thinking that having it close to two edges that could potentially crop out areas that didn’t work together would help. It was definitely an improvement from my initial sketch, but my eyes kept going back to that corner. The elements just weren’t living with each other as comfortably as they were in other parts of the image.

Another problem with the placement of the tractor beam was the distortion caused by the extreme perspective. With most  2 or 3-point linear perspective that attempts to simulate real world space, at least one horizontal vanishing point is usually pretty far off to one side or the other of the image, while the other point is either closer to the edge of the image area or even in the image area itself. In this case, all 3 vanishing points are equidistant from the visible part of the image and that makes things get weird FAST, especially near the edges of the image. In trying to place the tractor beam in the top left corner, the perspective distortion became so extreme that what was supposed to be seen from the side could only be seen from below. I did some vertical scaling to “cheat” my way into a side view of that space but it didn’t feel like the problem had been completely solved. The only way to determine if that solution would work at all was to figure out a way to get some reference figures into the image to see if they could “live” in the space I’d created so far.

Report

Three Worlds, One Image: Creating the Underlying Structure

Work In Progress / 03 March 2022

The thumbnail sketch I’d created got me really excited about the direction the project was going but it also brought into focus a quality to this image that made it distinctly different from anything else I’ve ever worked on.

The primary thing the thumbnail reminded me of were the “prison” etchings created by Giovanni Battista Piranesi, architectural fantasies where the figures were dwarfed by the spaces they were in (if there were even figures included at all.) I’ve spent most of my illustration career drawing figures, with the surrounding space being nothing more than the setting for them. The stars of the show were the figures and the background was just that: background.

With this image, the background was going to be the star and the figures were going to be relegated to a supporting role, primarily there to give a reference for the scale of the spaces as well as indicating what direction their particular world was facing ( a consideration that never has to be made in a conventional image.) I’ve been continually surprised by how challenging that conceptual turning-inside-out has been for me to deal with as I go through this project.

With the primacy of the space in mind, I started going about hammering out the overall architecture. I’d already established that I wanted the final image to be done in Adobe Illustrator, very clean-edged and graphic, possibly with a limited palette that would make each of the 3 worlds distinct. One of the benefits that I immediately experienced as I got to work was being forced to become thoroughly familiar with Illustrator’s perspective grid. I’d occasionally used it in previous illustration assignments whenever I needed any “quick and dirty” perspective work, but anything that got too 3D was easier done in Blender, a program I’ve come to love in the 5+ years I’ve been using it. By comparison, Illustrator’s 3D tools can be relatively clunky, but the more I got to know them, the more enjoyable using them came to be and the more possibilities they opened up. Because they aren’t trying to accurately reproduce real world physics (as Blender tries to do) the kind of shapes that come out of Illustrator’s 3D tools are more graphic, emphasizing line rather than volume, which was more in keeping with the kind of look I wanted the finished image to have.

My plan at this stage was to create a basic structure in Illustrator, which I could then use to place reference figures in the correct perspective after importing it into Blender. I wasn’t thinking in terms of color yet—it was all about getting a clear structure in linear perspective to use as a scaffolding to hang everything else on.

The lower right quadrant of the image was going to be the egg chamber from Alien and there was really no way I was going to be able to "rough in" the kind of alien architecture Giger created for that space, so I just added a floor grid for the time being, to give myself a clear idea of the depth of the space, so I could "Giger it up" later on. I added a reference rectangle in the upper left corner Transporter Room from Star Trek, to give myself an idea of the relative size the figures were going to be. The great thing about Illustrator's perspective grid was that I could slide that rectangle around in 3D space so I could see what size a figure would be at any place in the image.

The next step was going to be filling it all in with some local color to see if each space I’d chosen to include in the image worked well with all the others.

Report

Three Worlds, One Image: Preliminary Sketches

Work In Progress / 24 February 2022

A 3D artist I saw on blenderartists.org had created a 3D CGI version of M.C. Escher's image, Relativity. Escher has been an inspiration for a lot of my personal non-published work for a long time--it wasn't long after I started making digital art that I tried my hand at creating tessellations--so seeing the digital version of Relativity stayed with me for days.

I started wondering, "what if, instead of having 3 groups of people oriented to each of the 3 vanishing points in the image, a different world originated from each vanishing point?" That led me to think of the ways I could make those worlds distinct, yet have them all coexist within the same image.

As I was kicking ideas around in my head, I spent some time studying Escher's image to make sense of the perspective. The vanishing points form the vertices of an equilateral triangle, each edge of which is used as an horizon line, with the vertex opposite the edge serving as an upper or lower vanishing point. It’s actually a lot easier to see than explain:

As I studied Relativity, my eyes kept going back to the figure walking up the stairs at the bottom of the image. I loved the way that figure seemed to lead the viewer into the image (at least that’s what it did for me.) I suddenly had a flash mental image of Luke Skywalker walking up the stairs to begin the climactic fight with Darth Vader at the end of Empire Strikes Back and I knew I had the beginnings of an idea.

It took a while to fully form, though. At first, I thought I might try to show the same moment from 3 different viewpoints (one idea was to show Luke’s hand being cut off from below, above and relatively straight ahead) but it seemed too confining and I still really loved the idea of there being 3 different worlds.

Thinking about Star Wars led me to think about all the other sci-fi/space fantasy stuff I grew up loving and how much influence it had in making me want to draw pictures for a living. It wasn’t too long before I wanted to try combining Star Trek with Star Wars. Star Trek has such a distinctive design that I thought it would be immediately recognizable and distinct while still complementing the Star Wars stuff coming from the other vanishing point. That left one more vanishing point to inhabit!

I’ve always been a huge fan of the original Alien. The movie itself is great and there is so much great design work from H.R. Giger, Moebius, Chris Foss that it’s always stayed with me. I had my third vanishing point.

I created a 3-color perspective grid in Adobe Illustrator and started playing around with adding quick thumbnail characters to it after importing it into Photoshop. The focus was primarily on the characters at this point, but what I soon found out is that the space is the star in this kind of image. That ended up reinforcing my choices for the 3 worlds—each of them is so immediately recognizable in their own right that there was plenty of material to draw from in the ships, environments and interiors from all 3 of them.

The result of this stage was a quick thumbnail that already enabled me to visualize the way everything could work together:

The next step was to create an underlying structure that would work being seen from 3 different directions.


Report