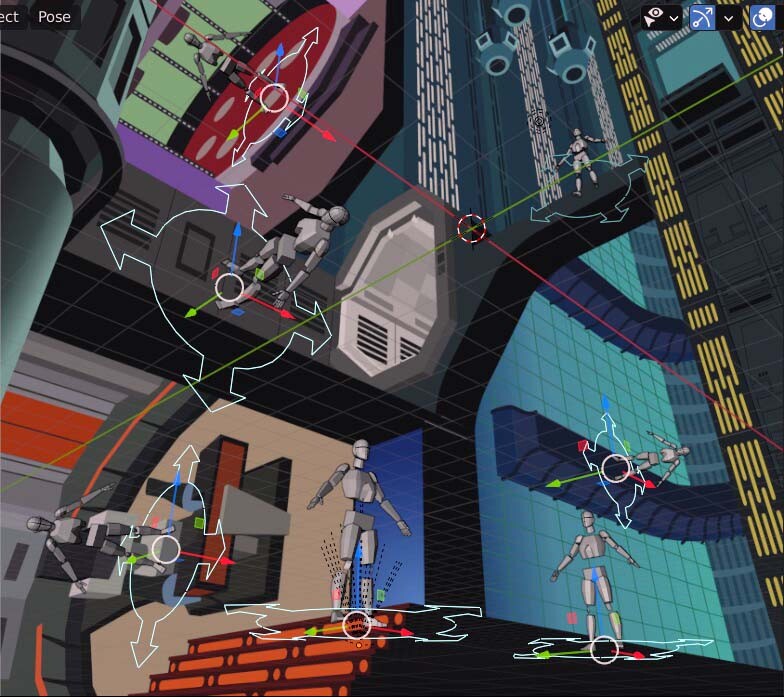
Now that I had the environment relatively well established, it was time to start adding some figures. While the space was really going to be the “star” of the image, the figures were going to be crucial, not only to give a clear indication of the direction each of the 3 worlds was pointed but also to make each of them immediately recognizable. The transporter room from Star Trek was going to look a whole lot more like the transporter room from Star Trek with Spock and Uhura standing in it.
The unnatural perspective was going to make drawing figures that fit comfortably in the space an unusual challenge. It can be difficult enough to draw figures in conventional perspective but having many of them rotated 90 degrees in either direction from the upright axis was adding an extra level of difficulty.
I discovered the 3D package Blender a few years ago and became absolutely obsessed with it. It is enormously powerful software that enables me to create just about anything in 3 dimensions and I’ve used it often in my professional illustration work, primarily to create quick, basic low-poly models of things like cars and appliances to use as reference for more fully realized images created in Photoshop and Illustrator. While the Blender-to-Photohsop/Illustrator workflow worked just fine for more conventional images, in order to create 3D references for this image I was going to need to work backwards: bring the 2D image of the space I’d created in Illustrator to use as a reference for the 3D reference figures and objects I’d be creating in Blender. This was going to necessitate finding a way to make the virtual camera in Blender match the perspective that I’d already established using the 3-point perspective grid in Illustrator and that wasn’t going to be as easy as it might at first seem to be.
Blender’s virtual cameras attempt to simulate real-world cameras as closely as possible, calculating things like focal length, f-stops and depth of field to match real-world conditions as if you were looking through a real camera and not a computer screen. Illustrator’s perspective grid doesn’t try to do any such thing: it essentially automates the creation of the same kind of linear perspective that artists developed during the Renaissance. While this kind of perspective was revolutionary in enabling artists to create a sense of 3-dimensional depth on a 2-dimensional surface, it’s still an abstraction from the real-world visual experience and while it was exactly what I needed for the image I was creating, getting it to play nice with Blender’s cameras was going to require some work.
Thankfully, I discovered a great add-on for Blender called fSpy that handles photo-matching: using information from a source image like a photo or drawing to place Blender’s virtual camera in the position it would need to be to see the objects in the image from that vantage point. I imported the Illustrator layout into fSpy and lined up fSpy’s reference axes with strong diagonals in the image and fSpy created the camera I could then use in Blender to get everything working together. The camera still doesn’t match up perfectly with the base image—it still attempts to create a real-world view from that vantage point—but it was definitely an enormous step in the right direction to help me create useful reference figures in 3D space that I could use to create final drawings of the figures in Illustrator.
The next challenge was to create the reference figures themselves in Blender.
